AI sticker from your photo: Nano Banana sticker prompts
By GetStepSnap · Tested October 8, 2026
Attach a photo, paste a prompt, and Nano Banana 2.1 draws it as a sticker with a white die-cut border: your cat, a sheet of your dog, a pack of chat stickers of you, or a whole page of stickers from a trip.
Every result below is the first one we got at 1K, resized and nothing else. The pet, selfie and street photos were made with the model; the temple is a real photo from our own trip, with the visitors' faces blurred.
Stickers from a photo of your pet
One photo of your cat or dog is enough for a single die-cut sticker or a whole sheet.
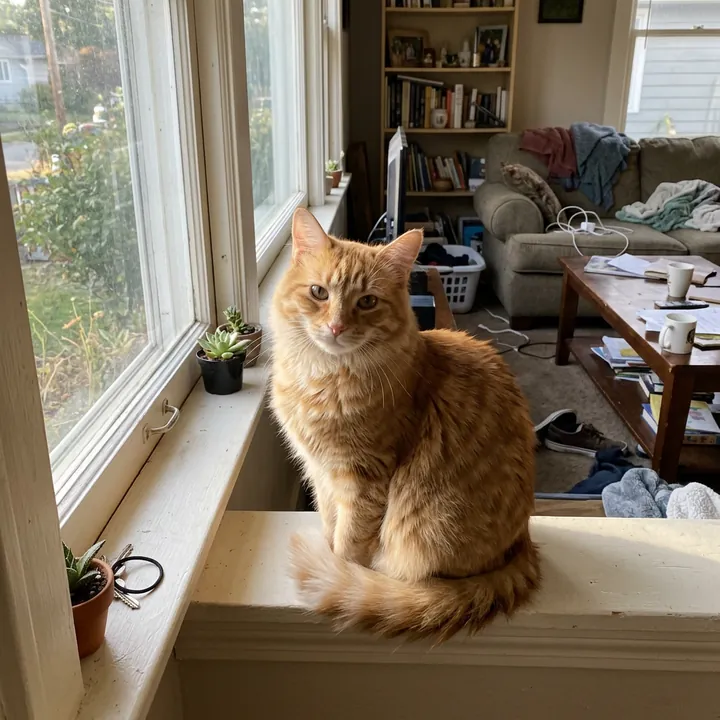
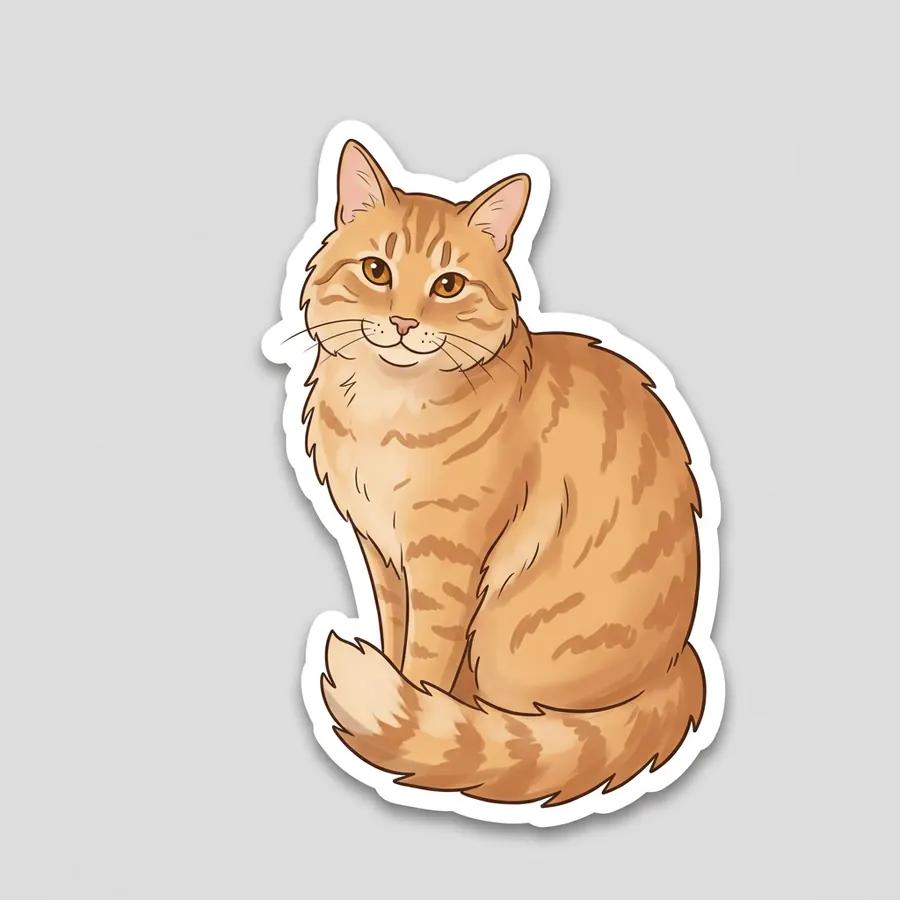
Die-cut cat sticker
Turn the cat in this photo into a die-cut sticker: the same orange tabby, drawn as a cute illustrated sticker with clean outlines and soft shading, sitting the way it sits in the photo, with a thick white border following its outline and a soft shadow, on a plain light gray background. Keep its markings and face recognizable.
A clean illustrated sticker with a white border; the stripes and the face look like the cat in the photo.
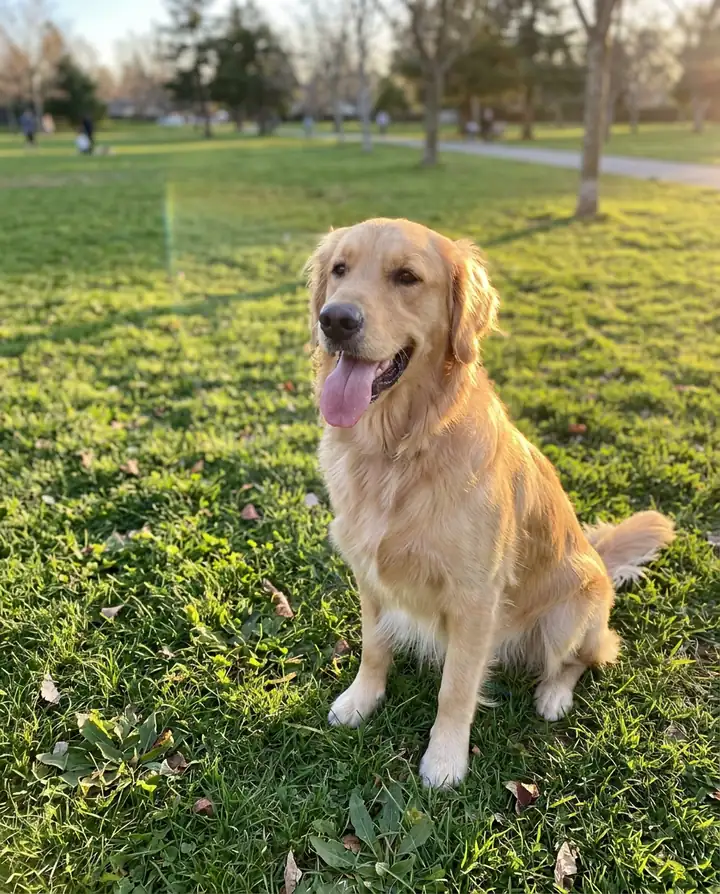
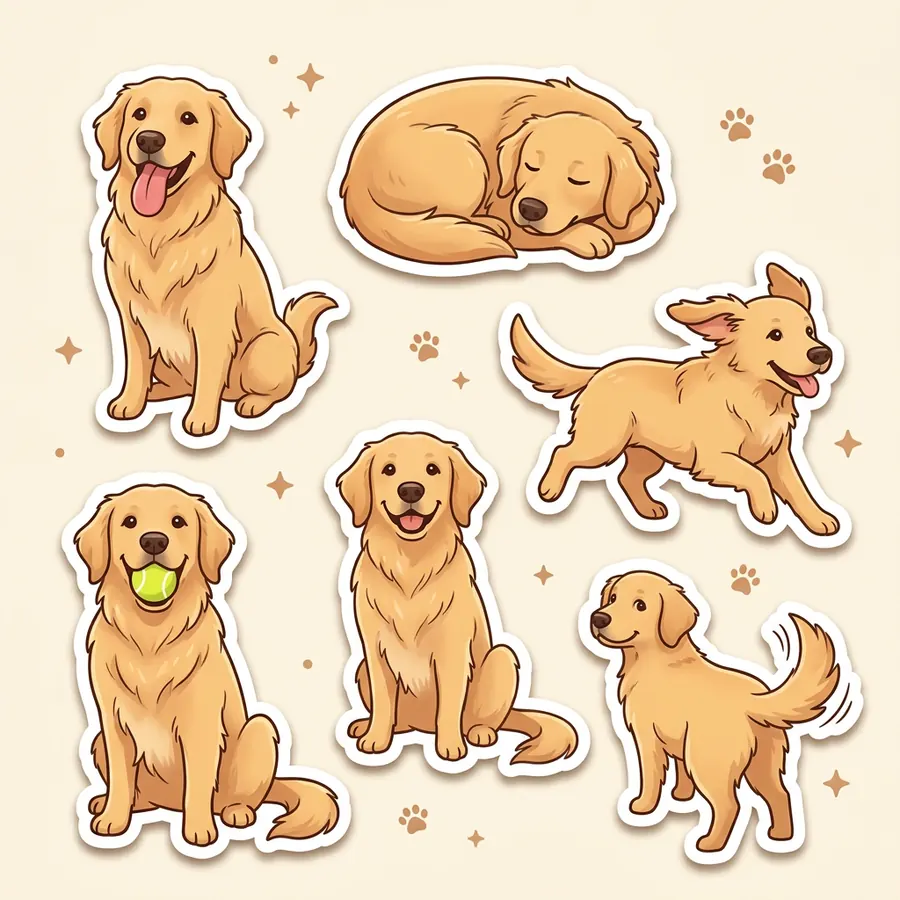
Dog sticker sheet
Make a sticker sheet of the dog in this photo: six die-cut stickers of the same golden retriever in different poses (tongue out, asleep, running, holding a tennis ball, sitting, wagging), drawn in a cute illustrated style with clean outlines, each with a white border and a soft shadow, spread out on a light background. Keep its face and coat recognizable.
All six poses, each cut out with a white border. It added a few paw prints and sparkles between them.
Stickers from a selfie
A chibi pack for chats, or one bold sticker for a laptop or water bottle.
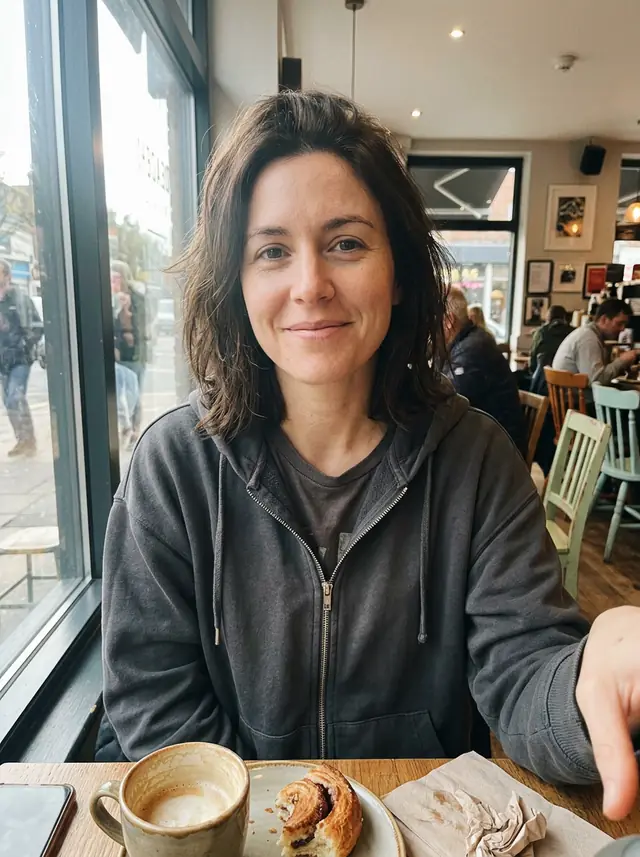
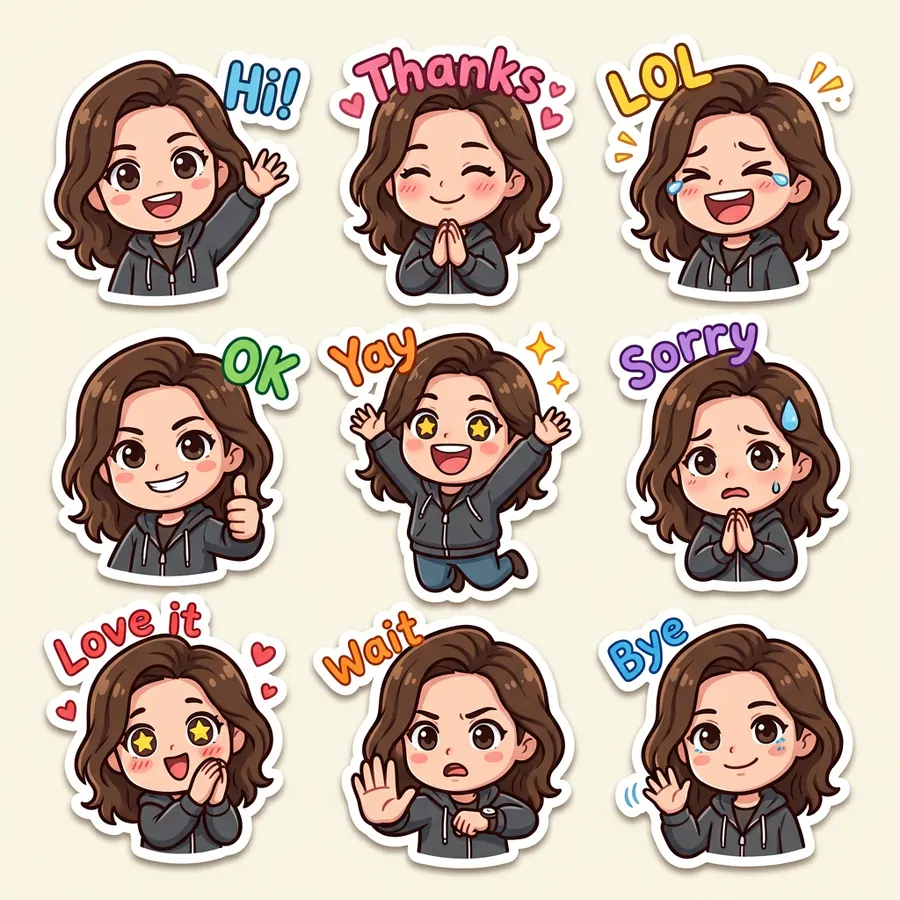
Chibi sticker pack with words
Turn the woman in this photo into a pack of nine chibi stickers for a messaging app: the same face, hair and gray hoodie, drawn as a cute chibi character with a big head and small body. Each sticker shows a different expression with one short word in bold letters: "Hi!", "Thanks", "LOL", "OK", "Yay", "Sorry", "Love it", "Wait", "Bye". Every sticker has a white die-cut border; arrange them in a loose grid on a light background.
Nine expressions, and all nine words came out spelled right. The hair and gray hoodie carry over from the selfie. It comes as one image; crop out each sticker to use it on its own.


Laptop sticker with a banner
Turn the man in this photo into one vinyl laptop sticker: a bold, flat-color illustrated portrait of the same man from the chest up, with clean outlines and a few simple shadows, a thick white die-cut border, and a small banner under him that reads "Coffee first". Plain white background.
A simplified flat-color portrait that still looks like him, with the banner spelled right.
A travel sticker page from your trip photo
The photo stays on top; below it, one hand-drawn picture of the place and up to five stickers of its details. Put the place name at the end, or "none".
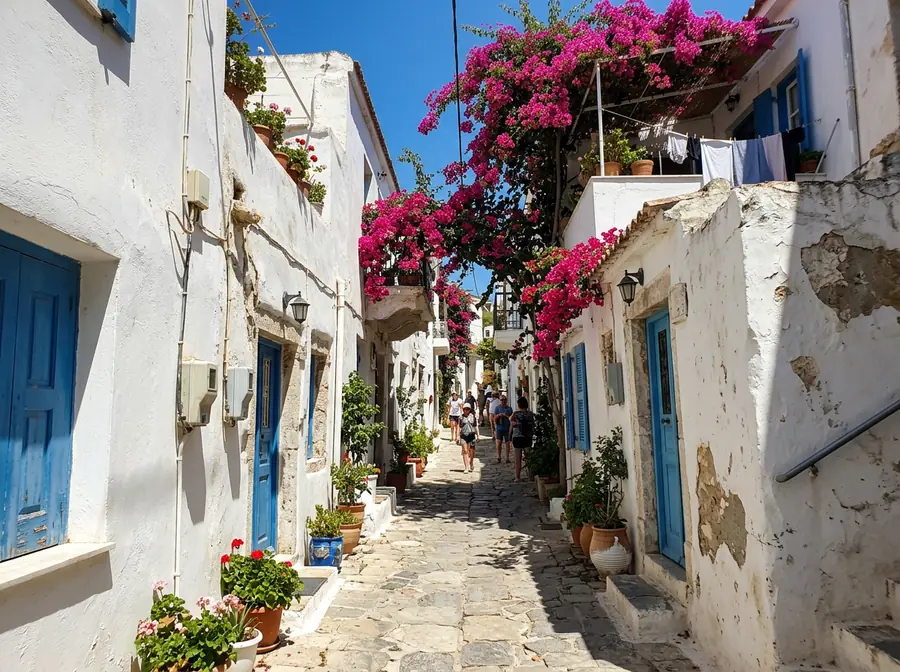
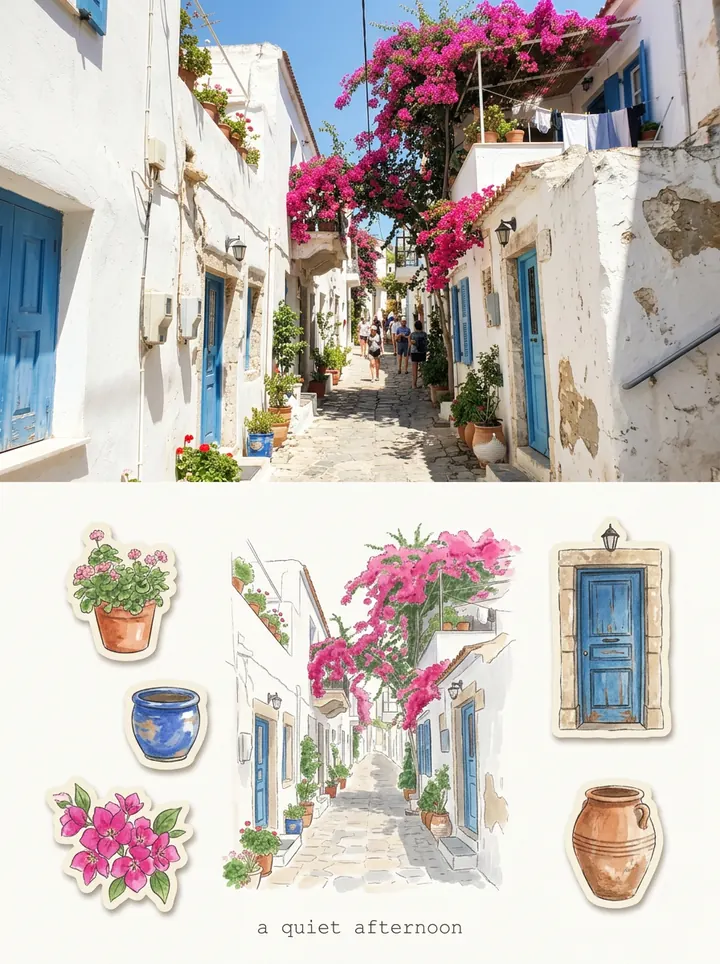
Whitewashed street
Make a 3:4 travel memory poster from this photo, split across the middle: the real photo on top, a hand-drawn sticker page below. Top half: the original photo, true to its subject, structure, proportions, viewpoint, light and mood, with a light color grade. Crop to fit; never stretch or change the subject or add objects. Bottom half, on clean warm off-white paper: one main illustration and five detail stickers. The main illustration redraws the most recognizable subject as a small hand-drawn travel drawing, keeping its outline and character, without clutter or passers-by. Each sticker shows a different detail from the same photo, such as a pattern, a door, the eaves, a plant or an object, never a smaller copy of the main drawing. Every detail must be in the photo; use fewer stickers if needed. Style: refined travel-journal art in light watercolor, soft gouache and a little colored pencil: simple color shapes, fine detail where it matters, paper grain, hand-drawn edges; no photo filter, dense line work, vector or cartoon look. Each piece has a narrow cream die-cut border following its outline, like a sticker cut from thick paper, with a soft shadow; no thick borders, shine or 3D. The main drawing anchors the page; the stickers sit around it, loose and asymmetric, never in a grid, in varied sizes with room to breathe. Use 2 to 4 colors from the photo throughout. Text: one short line in a light serif or typewriter font. Place name: none.
One drawing of the street and five stickers of things in the photo: geraniums, a blue pot, bougainvillea, a door and a clay jar. With no place name, it wrote its own line, "a quiet afternoon".

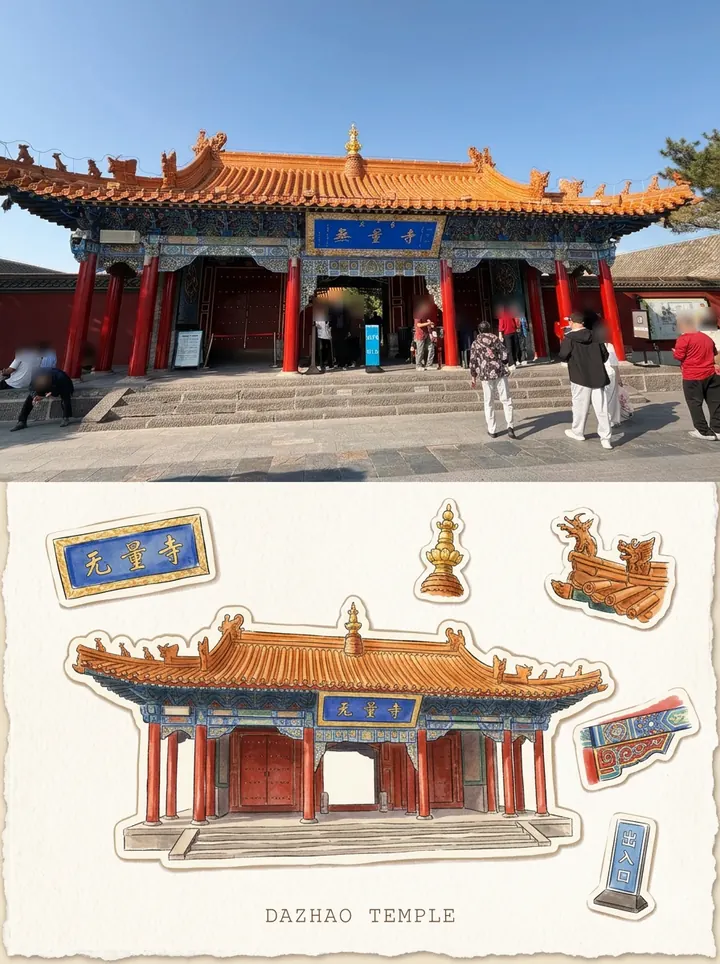
Dazhao Temple, from our own trip
Make a 3:4 travel memory poster from this photo, split across the middle: the real photo on top, a hand-drawn sticker page below. Top half: the original photo, true to its subject, structure, proportions, viewpoint, light and mood, with a light color grade. Crop to fit; never stretch or change the subject or add objects. Bottom half, on clean warm off-white paper: one main illustration and five detail stickers. The main illustration redraws the most recognizable subject as a small hand-drawn travel drawing, keeping its outline and character, without clutter or passers-by. Each sticker shows a different detail from the same photo, such as a pattern, a door, the eaves, a plant or an object, never a smaller copy of the main drawing. Every detail must be in the photo; use fewer stickers if needed. Style: refined travel-journal art in light watercolor, soft gouache and a little colored pencil: simple color shapes, fine detail where it matters, paper grain, hand-drawn edges; no photo filter, dense line work, vector or cartoon look. Each piece has a narrow cream die-cut border following its outline, like a sticker cut from thick paper, with a soft shadow; no thick borders, shine or 3D. The main drawing anchors the page; the stickers sit around it, loose and asymmetric, never in a grid, in varied sizes with room to breathe. Use 2 to 4 colors from the photo throughout. Text: one short line in a light serif or typewriter font. Place name: Dazhao Temple.
A real photo from our own trip; we blurred the visitors' faces. The drawings follow the gate, the plaque, the finial and the entrance sign closely, but the plaque's traditional 無 came out as the simplified 无.
The travel sticker prompt
Attach one trip photo and put the place name at the end, or "none" to let the model write a short line of its own. Choose 3:4.
Make a 3:4 travel memory poster from this photo, split across the middle: the real photo on top, a hand-drawn sticker page below. Top half: the original photo, true to its subject, structure, proportions, viewpoint, light and mood, with a light color grade. Crop to fit; never stretch or change the subject or add objects. Bottom half, on clean warm off-white paper: one main illustration and five detail stickers. The main illustration redraws the most recognizable subject as a small hand-drawn travel drawing, keeping its outline and character, without clutter or passers-by. Each sticker shows a different detail from the same photo, such as a pattern, a door, the eaves, a plant or an object, never a smaller copy of the main drawing. Every detail must be in the photo; use fewer stickers if needed. Style: refined travel-journal art in light watercolor, soft gouache and a little colored pencil: simple color shapes, fine detail where it matters, paper grain, hand-drawn edges; no photo filter, dense line work, vector or cartoon look. Each piece has a narrow cream die-cut border following its outline, like a sticker cut from thick paper, with a soft shadow; no thick borders, shine or 3D. The main drawing anchors the page; the stickers sit around it, loose and asymmetric, never in a grid, in varied sizes with room to breathe. Use 2 to 4 colors from the photo throughout. Text: one short line in a light serif or typewriter font. Place name: [place, or none].
Tips
- Ask for the border. Every one of our sticker prompts asks for a white die-cut border around each sticker.
- Keep words short. One or two words per sticker, in quotes; our nine came out spelled right.
- Check text in other scripts. On our temple page the Chinese plaque came back in a simplified character. If the exact lettering matters, check it.
- Use 1:1 for stickers, 3:4 for a travel page. Those are the shapes we used.
What it costs
On GetStepSnap your first 1K image is free. After that a sticker takes 1 credit at 1K or 2K, and 100 credits cost $9.90 (plus local tax where it applies), about $0.10 each, with no subscription. Ours took 18 to 25 seconds each. For toys instead of stickers, see turn a photo into an action figure.
Questions
Can AI turn my photo into a sticker?
Yes. Attach the photo, say what kind of sticker you want (a die-cut sticker, a sticker sheet or a pack of expressions) and ask for a white border. Our cat, dog, selfie and street photo all came back as stickers on the first try.
Can I make chat stickers of myself?
Our chibi pack came back as one image with nine stickers and nine short words, all spelled right. Crop out each sticker to use it on its own.
Can I print the stickers?
Yes, they're ordinary images with a white border around each sticker. For printing, choose 2K (1 credit) or 4K (3 credits); a print shop or a cutting machine does the cutting.
Is there a free AI sticker generator?
On GetStepSnap your first 1K image is free. After that a sticker takes 1 credit at 1K, and 100 credits cost $9.90 (plus local tax where it applies). No subscription.
What happens to the photos I upload?
We store them so the model can read them and so your results stay in your account. We don't sell them or use them for anything else. To have them deleted, email support@getstepsnap.com.